Speak Easy™
Introduction
The Speak-Easy™ module interfaces to the Leopard™ or Ocelot™ controllers to play pre-recorded audio messages. Messages may be recorded using the on-board microphone or any audio line-level device such as a PC soundcard, tape deck, etc. The Speak-Easy™ has the option of 50 five second messages, 24 ten second messages, or 12 twenty second messages. The Speak-Easy™ can drive an 8
ohm speaker directly or may be connected to an external audio amplifier.
Specifications
Power: Input Voltage 12VAC
Input Current Max 200mA
Audio: Speaker Output 1W @ 8Ω
Monitor Output 570mV @ 5KΩ
Monitor Input 110mVp-p
Dimensions: 5.5”L x 3.25”L x 1.38”D
Operating
Temperature: 0ºC to 70ºC
Setup
Typical Wiring Diagram
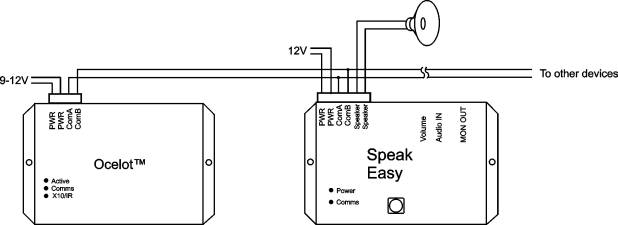
Figure 1
For best results the power supply used for the Speak Easy™ should not be used to power any other devices.
Programmable Parameters
|
Parameter |
Function |
Factory Setting |
|
1 |
Device Address |
1 |
|
5 |
Message Length |
0 |
Message Length Parameter
|
Parameter Value |
Message Length (Seconds) |
Number of Messages |
|
0 |
4.8 |
50 |
|
1 |
10 |
24 |
|
2 |
20 |
12 |
Note: All messages must be the same length. It is not possible to have some 5 seconds messages and some 10 second messages.
Jumper Settings
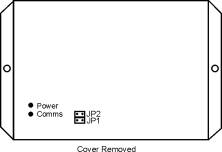
Figure 2
The Speak Easy™ comes from the factory with a jumper installed in the JP1 location. This allows the front panel microphone to be used for message recording. To use the Audio In connection for recording, remove the jumper from JP1 and install on JP2 (see Figure 2). Note, only one jumper should be installed.
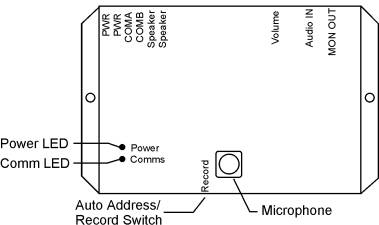
Operation
Power LED Status Codes:
Red – Solid Device address is not programmed
Red – Slow Blink Device address is programmed (normal operation mode)
Red – Fast Blink Auto Address mode is active
Green – Fast Blink Ready to record a message
Green – Solid Recording a message
Orange – Solid Playing a message
Recording a Message:
· Start the C-Max software.
· From the main menu select Comms, then select Attach to CPUXA
· The CPUXA Access screen will appear. Select Module Utilities then select Speak Easy.
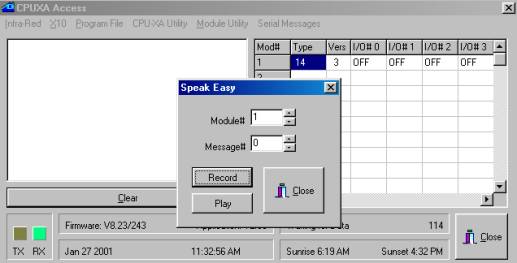
· Select the module number of the Speak Easy™ and the message number to record then click the RECORD button.
· The Power LED on the Speak Easy™ will begin to blink green.
· Press and hold the Auto Address/Record button on the Speak Easy™.
· The Power LED on the Speak Easy™ will turn to solid green and start recording.
· Release the Auto Address/Record button to stop recording. The Power LED will start blinking red.
· The Speak Easy™ will automatically stop recording if the maximum message length is reached.
Playing a Message
Using C-Max
· Access the Speak Easy Module Utility as described in the Recording a message section
· Select the module number of the Speak Easy™ and the message number to play then click the PLAY button.
· The message will begin to play and the Power LED will turn solid orange.
· When the message is finished the Power LED will return to blinking red.
· Using an Ocelot program
